How To Draw Human Faces For Beginners
If you want to draw a human face, Here is sketchytips.com, which will walk you through the steps of sketching a human face if you want to learn how to do it. so If you pay proper attention to rehearsal, observation, and detail, then you can learn to draw human faces.
It can be fun and creative to draw people's faces. It necessitates practise, observation, and close attention to detail. Here is an easy-to-follow guide on how to draw a simple human face:
Tools for drawing faces
Any great product, whether it's a car or a house, starts with the right tools, and drawing is no different. While the materials you need to create a realistic human face seem obvious, choosing the right combination of tools can make or break your efforts.
To draw a face, you will need:
Use the H-Pencil for the basic shape and outlines. If you want finer details, use an HB pencil. Use a 4B pencil for shadows that emphasise a realistic look. Kneaded rubber to show details and correct imperfections A device for accurately measuring grid lines Micro-perforated sketch paper that makes corrections easy.
First step
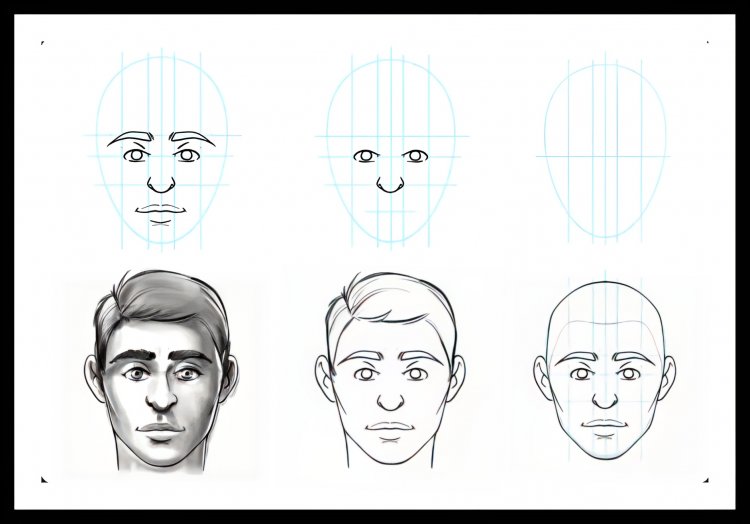
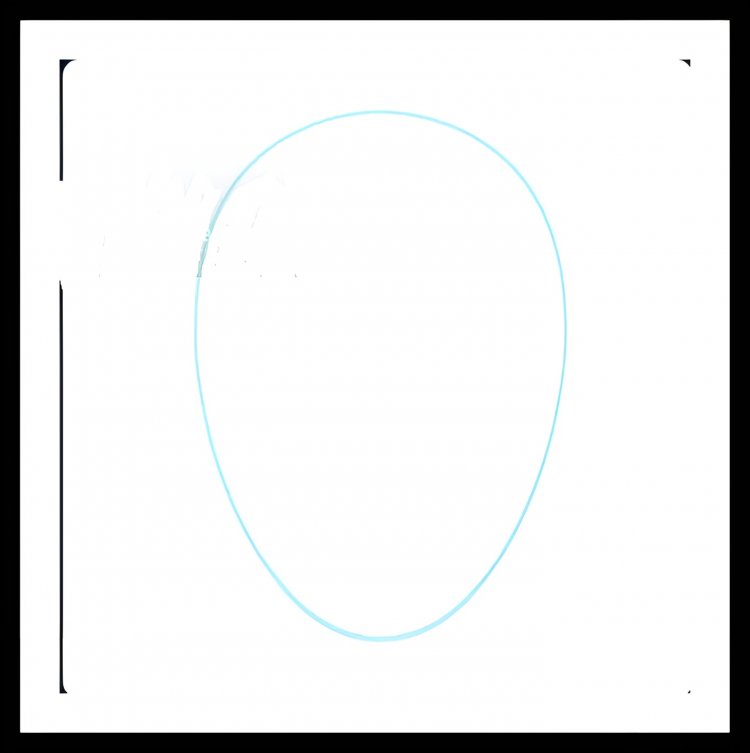
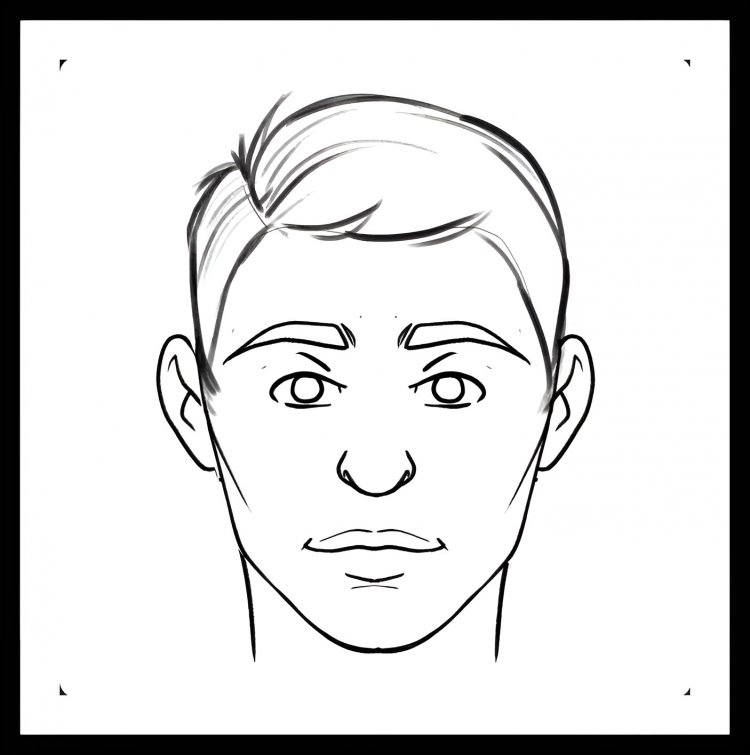
Begin with a simple shape. Start by sketching a rough contour of the head using an oval or an egg-shaped shape. This will act as the face's framework. Draw an oval-shaped head. Drawing an oval-shaped head form is the initial stage in sketching a face. Just visualise an upside-down egg and draw its outline on your paper.
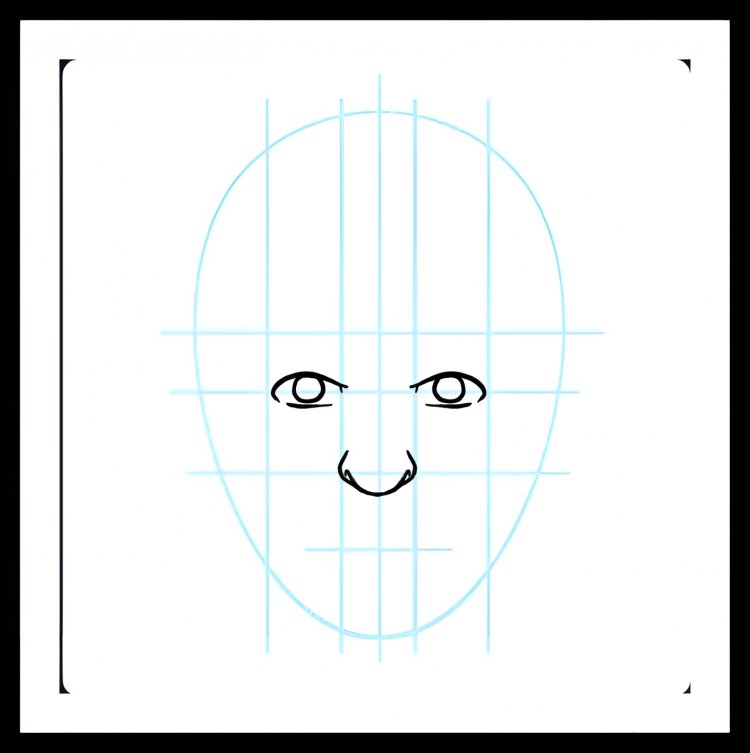
Second step
Segment the face.
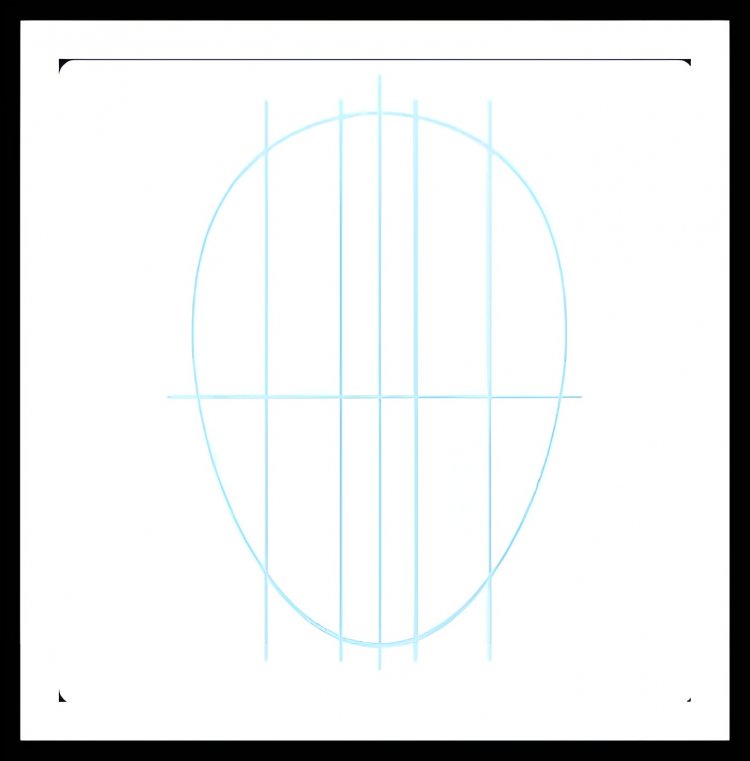
Next, to help you establish symmetry, draw a vertical line through the middle of the face. Next, trace a horizontal line through the oval's centre. This line will show where the eyes are located. After creating this basic design, you should add a few lines to help you later place the eyes and the nose. To divide the two halves of your character's face, start by drawing a vertical line down the middle of your drawing. Then draw a horizontal line passing halfway between the character's chin and the top of their head. This marks the area where the eyes will be filled in later and will aid in creating some symmetry for the character's facial characteristics. To indicate the corners of the eyes and the area for the nose, you can draw two more vertical lines, one on either side of the centre line.
Third step
Arrangement of the features
Position the eyes, nose, and mouth using the horizontal line as a reference. The eyes are typically positioned with enough room between them for another eye, halfway between the top of the head and the horizontal line. The mouth is typically placed just below the nose, while the nose is typically positioned below the eyes.
ADD MORE DIRECTIVES TO THE SUBMISSION
The next thing to do is to add some conventional measures to block out the remaining elements of the face, such as the lips, ears, and eyebrows. To indicate where the eyes will be, you previously put a horizontal line in the middle of the sketch. Adding a second line above this point will now indicate where your character's eyebrows will be.
After that, draw a second horizontal line halfway between the first one and the bottom of the chin once more. The ears will be positioned here on the outside of your comic book character's face, where the nose will finally stop. Draw a second horizontal line for the mouth's placement, centered between the previous line and the chin. You can get an idea of how the face will be laid out from this point, but if you still need help figuring out where to put things, you can add extra lines as necessary by following the example shown below.
Step-by-step Drawing Face Instructions: 4 Ways to Perfect the
Details
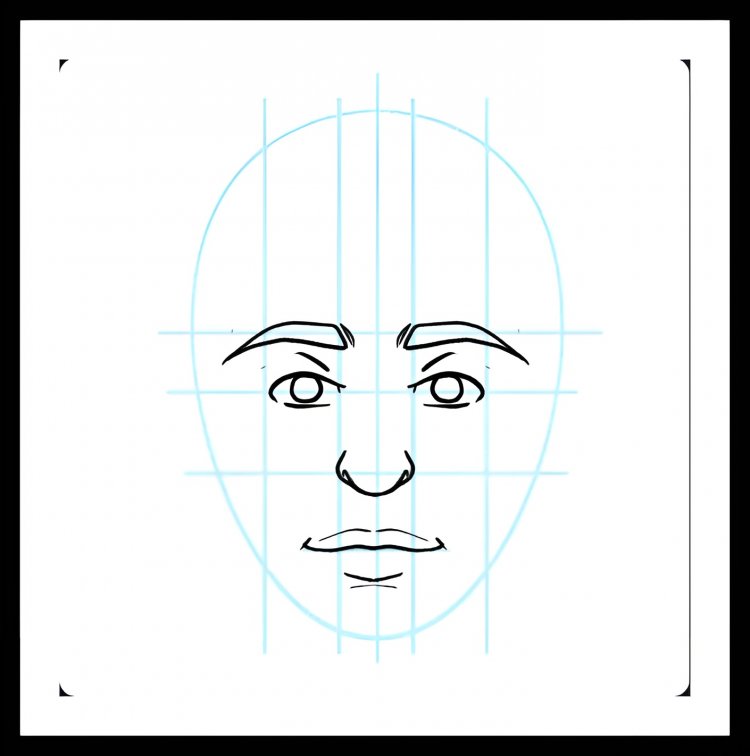
First step
ROLL YOUR EYES
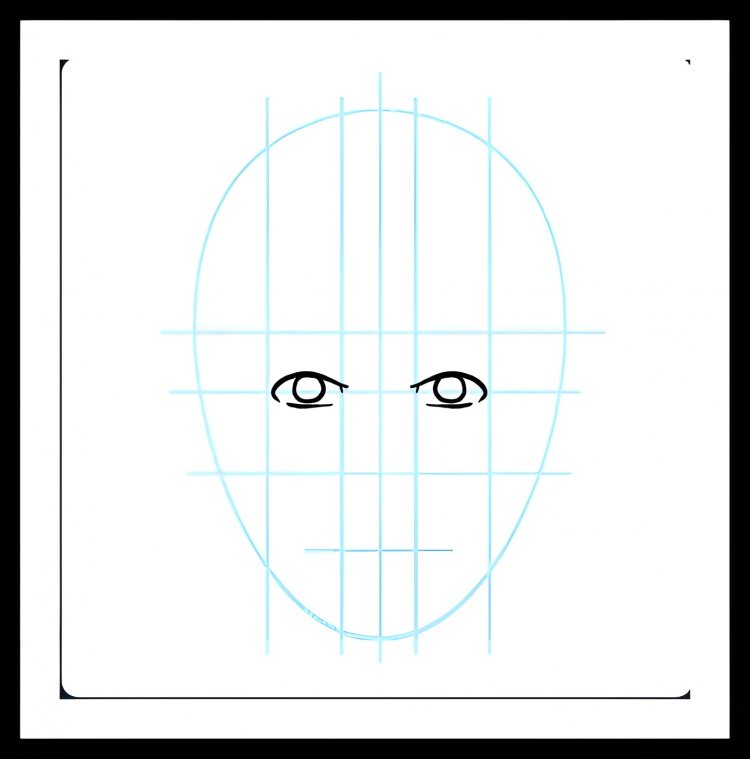
Now that the basic setup is complete, it's time to start adding features to your cartoon. To simplify things, let's start from the top of the head down. In most cases, the distance between the eyes should be considered ideal for human eyes. Start drawing your eyes in a sideways oval between the previous shorter vertical lines. It is recommended that the distance between the eyes be approximately the same as the distance between the eyes themselves. When you draw the second eye, make sure the space between them is about as wide as the eyes themselves. Now you have the perfect area to add a nose to your character. The eye's iris and pupil should then be added.The general expression of the face can be influenced by the direction the eyes are looking, so pay attention to this.
Second step
Your FACE DRAWING SHOULD HAVE A NOSE.
Although there are many different types and sizes of noses, for our purposes today, we'll concentrate on the fundamentals. The character's nose should terminate at the second horizontal line you made earlier, so start by drawing it between the character's eyes using simple shapes like triangles or ovals. When it comes to the size of your nose, you should fill in the space you created earlier between the eyes so that the nostrils' outer margins coincide with the position of your character's eyes. You decide how exactly your character's nose will look. Think of the shape that best represents the nose, since it is one feature that can. You're developing a distinct personality.
Third step
Pull OUT YOUR mouth.
You might start by drawing a horizontal line between the nose and the chin to represent the mouth. Then, draw the lips, taking into account their thickness and form. The third horizontal line you sketched earlier comes to mind. You should position your character's moot there. In terms of mouth width, a typical comic book figure will have a mouth that begins on either side at the centre of each eye, or possibly where the pupil is. This is the area where you can express your creativity the most in terms of the size and form of the lips. You have the option of making them thick, thin, Lips have a similar effect to the nose in terms of highlighting a character's individuality.
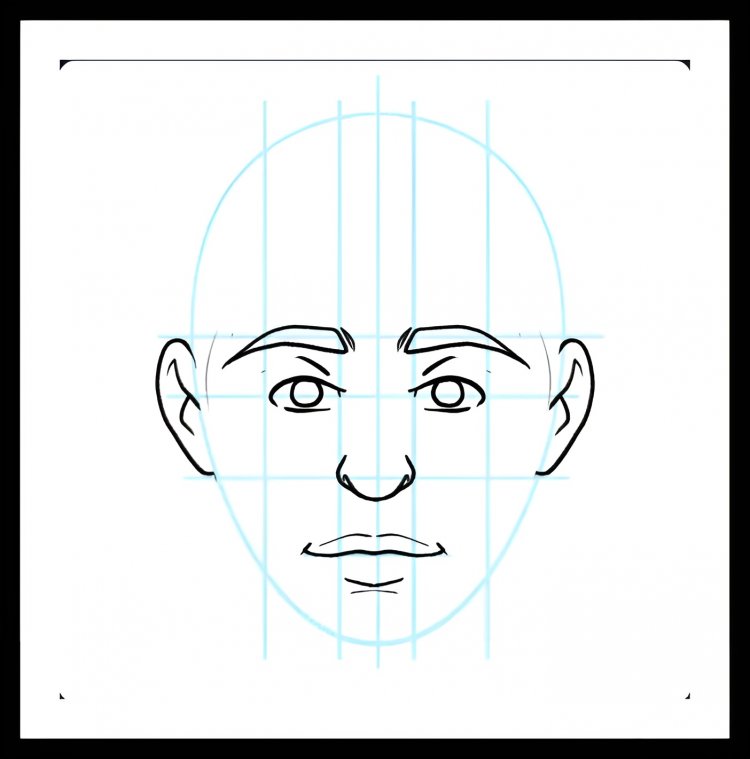
Forth step
REMEMBER TO LINE YOUR EYEBROWS
It's time to finish your drawing by adding extra details. Observe the eyes and brows. It should be simple to add eyebrows if you took our suggestion and drew a second horizontal line between the top of your head and your eye level. Because the lines of the nose always follow the browbone where the eyebrows are positioned on a human face, you should only work on the eyebrows once the nose is in place.
FINISH BY ADDING THE EARS, THE HAIR, AND THE
TOUCHES.
Drawing ears may sound difficult, but since you've previously created an excellent diagram to work with, doing so shouldn't be too difficult. The horizontal line that designates the position of the eyebrows should touch the top of the ears. The horizontal line you drew for the character's nose should touch the earlobe. Typically, the top of the ear will be in line with the eyebrows and the bottom with the nose. Right now, focus on mastering the fundamental shape of the ears rather than the specifics. On the other hand, drawing hair might take a little longer and be trickier.
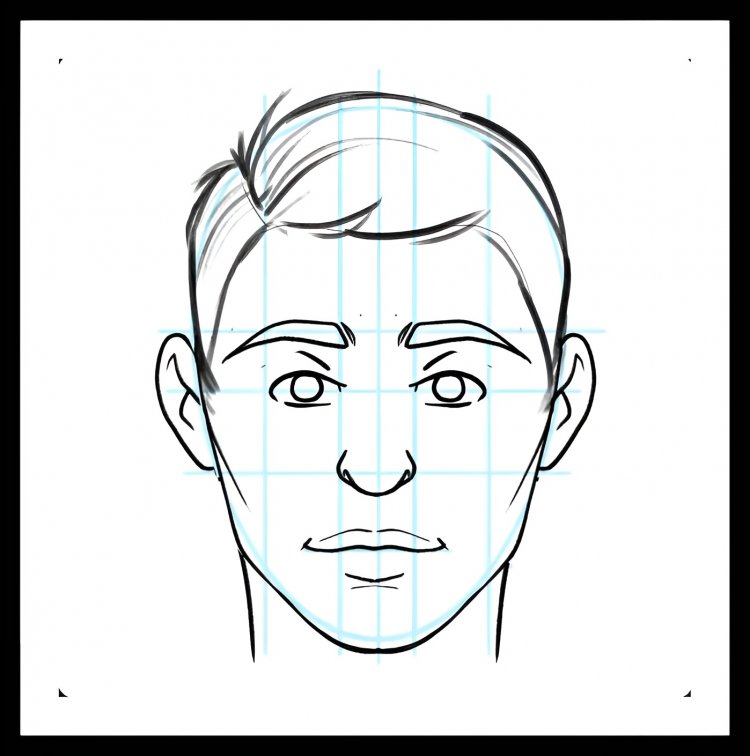
Draw the hairline now!
First, using tiny strokes of the H pencil and the natural hair growth pattern, define the hairline on the forehead and sides of the face. Then, as you work your way towards the borders of the haircut, begin to create texture and volume.

Hair contributes to the expression of a character's personality. It is totally up to you how much detail you add to your hair. Consider your character's characteristics and try to match them to their hairdo. Is your comic book character professional and serious? If so, a slicked-back look could be best. Curls or other sorts of untamed hairstyles, on the other hand, may be the finest choice if you want to depict a wild and unpredictable nature. We chose a short male hairstyle with a part on the left side for this experiment. Your sketch is almost done if you finish drawing the hair!
To finish,erase the guidelines.
It's time to get rid of the rules!
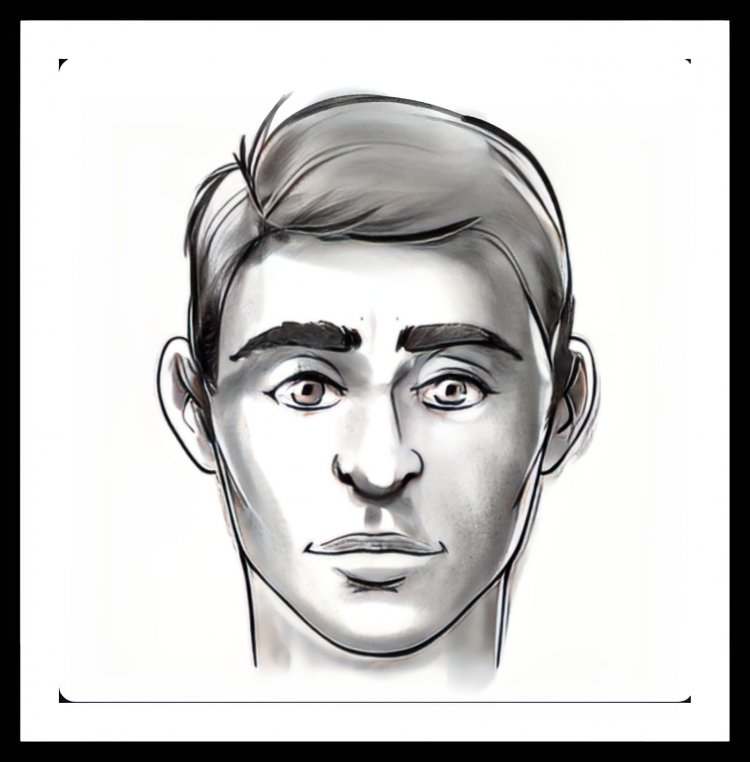
Last but not least, don't forget about your drawing's finishing touches.
- Using your 4B pencil, add shadows as needed.
- With your rubber, lift some highlights.
- Combine the main lines and textures.
- That's all there is to learning how to draw a face!
Remember that drawing is a skill that develops with practise. Don't be discouraged if your first Your attempts don't go exactly as you envisioned. Keep practising, learn facial anatomy, and experiment with different techniques. With time and With dedication, you will continue to develop your skills and create more accurate and realistic human faces
What's Your Reaction?